Showing posts with label craft. Show all posts

Saturday, March 5, 2011

Displaying Kids Artwork

I have seen several different ways to display kids' artwork all over blogland and on the internet.  My favorites came from none other than Pottery Barn Kids.  This one, but I really didn't want to spend $39 on a piece of wire... my friend had gotten one from IKEA and it was more plain, but still cute... but again, I didn't want to spend a whole lot of money on it.

So I got my trusty husband to cut down a 1 by 4 we had in the garage from another project.  I had ordered some giant clothes pins from Oriental Trading Company (I got a dozen for $6 on clearance, couldn't pass it up- the link is to similar clips, but not the same kit I got), so I painted those a dark brown.

I had some coordinating fabric left over from  my mail center project, but it was just a couple of inches short to cover the whole board.  Doh.  Anyway, I got out my sewing machine and SEWED MY VERY FIRST PROJECT.  (so what if it was about 8 inches worth of sewing?  I did it, using my machine!). I then Mod Podged my fabric to the board.

After it dried I tried to velcro the clips to the board, but that didn't work.  So I ended up using Gorilla Glue.  Gorilla Glue expands, so I learned the hard way a little goes a long way and to keep it away from the edges.  I had to use an exacto knife to remove the glue from where I didn't want it, if you look close, you still see it... so don't look close, Okay?


 I can't wait for Jack-man and Max-man to make me some new paintings.  I think we will do something to do with Max-man's upcoming Baptism to decorate the board... maybe something BIG!  (Spooky was following us around because we had the laser studfinder out... she likes to chase the light).
Close up of the closepin.  I should have painted another coast, but I was too impaitent.  I guess I will have to take ti apart and do it sometime.
 This print is from Not Just Another Housewife, you can print it for free... plus she has one for girls, too!!  BTW, subway art is all over blogland... there are TONS out there for free and with different colors, seasons, etc.  I really love them all!! :)
  Close up of my SEWING PROJECT... see where I attached the brown circle and the && fabric?  Isn't it PERFECT??

Tuesday, February 15, 2011

Color Matching Boys

I found yet another craft to work on...


This is a great idea for a wooden toy.  It's a great color matching activity, children have to use small motor skills and even helps with recognizing color words.
I got the idea from here.  I changed it a bit by painting the little guys all one color and I added the color name to each the boy and the pot.  I used my Silhouette to cut out the vinyl for the color names and it worked so slick!  After painting I put on the word, then I covered them with Mod Podge and a spray  of acrylic sealer.  I ordered more so I could make them for some more gifts (now that I know how easy they are), of course I ordered the right sized boy and the wrong sized pots... oops.  Didn't get them all done! 

We gave them to this sweet little boy for his 2nd birthday!


I linked to this party:

Thursday, February 3, 2011

Valentine's Countdown

I am attempting to do SOMETHING educational with Jackson each day. For me, I need a plan (could this be because of my teacher-ness? Probably. I mean I even bought a lesson plan book so I could plan this kind of stuff out... old habits die hard). So I have been looking online and finally decided to just go for it and purchase a Valentine's Day Countdown from My Delicious Ambiguity. So stinkin' cute and I don't have to come up with the ideas! It took me forever to finally put it together but here is what I came up with for our Valentine Countdown.


Valentine's Countdown Days 1 & Day 2

This is the countdown.  I only used 14 days, although the kit came with 31 numbers and 70 activities!  I picked 17 I thinkto do, I put a couple activities in a few of the pockets to make the activity have a little more "meat" for the day.  I loved the variety though, because I picked activities Jackson can do this year and there are plenty to do next year with him and Maxwell!


 The Banner "Valentine Countdown" is the FIRST project I completed using my Silhouette SD.  Love it, although it took me 3 tries to figure out how to get it all to print, but now I have tried it and I will get moving on some other projects I have in mind.

I tried to get rid of these cookie sheets, but snagged them out of the Good Will bag to make this project.  I spray painted them pink, Andy drilled holes in them and I attached them together using ribbon. For #7-14 I Modge Podged them onto the cookie sheets.  I HATE the look and will probably re-do it for next year.  I used the glossy Modge Podge and I really don't like it. But otherwise I am happy with the project.


Day 1:  Counting Hearts
  Jman has a short attention span with counting when I want him to (he can count to 16 when you aren't paying attention to  him), but we tried a bit and then he just played.  He also used some plastic tongs to put the hearts in different sections of the numbered egg crate.


 materials for Day 1... #1-12 in the bottomof the egg carton, conversation hearts (but you could use beads or something else if your child is distracted by the candy).  I got some bowls at Walmart for $1.50 for 2.  I went a little crazy getting things for all our activities, but I will be able to use them next year, too!


Day 2:  Sandpaper Heart rubbings...

This did not go over very well.  Jackson was not into the rubbing and was just cranky (probably because I turned off Team Umizumi- his new favorite show).  But we tried!


 To make the little guy happy, I brought out the glitter glue (from Dollar Tree- super good deal). He loves this stuff! He left the activity smiling and happy to go take his bath.


What baby Maxwell was doing while we were trying to do the rubbings.

Some brotherly love. :)

Sunday, January 9, 2011

Easy boy art

When we moved this summer I started looking for artwork to decorate Jackson's new "big boy" room, because the new baby was getting his nursery things. I scoured stores and the internet, I found beautiful artwork- however beautiful artwork comes with a price-- way too high for a little boys' room.


I wracked my brain and remembered that I had made the nursery wallart from fabric and canvases. At first I was going to paint the canvases... but then while at Walmart, I found this fun fabric for $1 for a fat quarter (quarter of a yard) and I could get a fun texture by using the fabric. I picked out 4 of the 6 colors of fabric. I got the canvases at Hobby Lobby (2 for $3.99 regularly priced, but they are on sale all the time, so you can get them 40% off). I also found the pre-painted wooden shapes at Hobby Lobby-- one might be from Michael's, not for sure. They were $.69 each! I couldn't buy the wood for that price! So, for around $12 I got this fun artwork!


I first cut out the pieces of fabric a little bit more than what it would take to wrap all the way around the frame. I just folded the corners like a package. I stapled one of them, then Maxman got hungry and Andy finished up (don't tell him, but he did a much better job with getting them tight and clean corners than I did! :)

I then hotglued the wooden pieces onto the fabric, I pushed on the back of the canvas to make sure they stayed. Now, I just have to hang them up... :)

Linked it to a party... not sure how to do this... I (Heart) naptimewith chocolate

Valentine's Day Projects

I have several Valentine's Day projects in mind...


1. Cupcake liner wreath

2. Banner/Garland saying of some kind

3. 8x10 Subway art on canvas


While I am waiting to get a few of the materials I need for the above items... I made this:


It's a styrofoam ball! I spray painted it with "watermelon" spray paint, put a ribbon on it, and hot glued a little over 1 bag of the candy hearts. It took about 25 minutes to glue it all on... the paint takes about 30-45 minutes to dry, depending on how thick you put it on! Also, make sure you spread out the green and purple hearts, because their are barely any in each bag and you end up with big spots of pink and white. ;)

Tie crafts

I love easy and no-sew crafts--- I still haven't used my sewing machine... this week, I tell myself again for the 15th in a row... Here are a couple Tie crafts I've accomplished in the last few weeks.


This is a tie scarf made out of Jersey Knit fabric (stuff you make T-shirts out of), I found it on MaryJanes and Galoshes, cute site! It was super easy and really inexpensive to make. The hardest part was getting my butt downstairs to use the iron on the fabric! I think they will be gifts for a few people this year.


This is the tie blanket we made for Maxwell for Christmas. Andy helped me to tie the sides, super duper easy! There are tutorial out there if you don't know how to do it! I love the fabric for this project!

Monday, December 27, 2010

Hair Bows


I don't have little girls... I have nieces and two of my best friends have girls, so I live vicariously through them! This year for Christmas I wanted to do handmade gifts for these lovely girls in my life... there are two 3 year olds, one 1 year old, and two under one. So I came up with making hair bows... fueled by my obsession with Etsy.com and my friends (different friends) who were making hairbows for their little girls. So, I set out to get all the materials I needed (spent way too much on little stuff and ribbon I am sure) and made all these lovely bows for my favorite little girls!! I can't wait to give them all their gifts at Christmas. -- Now they are all given so I can post about it!!


I also made hairbow holders. I bought some cutouts at Michael's and Hobby Lobby that were pre-painted and added ribbon. They will look super cute in the girls' rooms (or closets, wherever they hang them)!

Wednesday, December 15, 2010

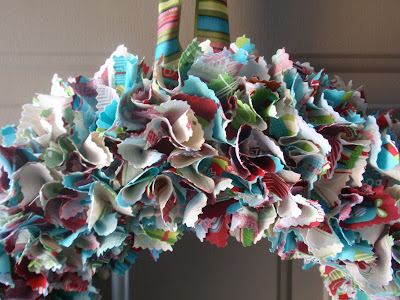
Fabric Wreath


I LOVE this wreath!


I got the fabric at JoAnn Fabrics and it didn't take too much time... I made a pretty big wreath so it took about 1.25 yards of fabric. I chose to only use 3 different kinds of fabric, because that was what I could find in the fabrics I liked (50% off though). I got the idea from Polka Dots and Pizza. She made a tutorial that you can take a look at. I wish I had a pinky blade for my roatary cutter, because cutting all the squares was hard on my fingers!!

Thursday, December 9, 2010

Yarn Wreath

So I finally tried one of the 1,000 cool ideas I found online for Christmas ... this does not mean I have any of my Christmas presents finished... ha ha!

I found some really cool wreaths on all the crafty blogs I follow... but I thought I would like one of these yarn wreaths. I found tutorials here and here. I bought all the stuff to do this wreath from Polka Dots and Pizza... but I definately need to get my Christmas presents finished BEFORE I can start on this one!!

I decided to use a 10 inch straw wreath for 2 reasons 1) it was only $2.79 at Hobby Lobby, so if I didn't like it or never got to it this winter, I wouldn't feel so bad. 2) I wanted to go small so I could have time to finish it! I used Sugar 'n Cream cotton crochet yarn called Misteltoe (mostly because it was cheap and had all three colors I was looking for on 1 roll... red, green, white). Anyhoo... I really like how it turned out. :) I finally was able to finish it last night when my 2 year old had finally headed to bed and was actually STAYING in his bed!!

Things I learned from this wreath:

1. Thicker yarn might be more expensive, but it won't take as long to wrap! :)
2. The wreath needs to be covered before you put on the yarn- I saw someone use some batting. I think it would make it smoother, the straw sticks up and makes it uneven.
3. It's imporant that you look at the back to make sure you aren't overlapping the yarn, because it will leave gaps.
4. USE the GLUE GUN A LOT!!


Wednesday, December 8, 2010

Gum drop tree

Yesterday, Jackson and I created a gum drop tree. I found it on this blog Jada Roo Can Do. I also saw it some other place and thought it would be cute. I thought I would be different and use green and red Christmas Bells. Yeah, big mistake! Jackson has since destroyed the tree by taking all the candy off and eating it (taking out the toothpicks- Thanfully). I should have used the spice drops... no one likes those. Oh, well, next year! The cute decoration lasted 1 night at least!!
Maxwell at age 4weeks!

Jackson fixing "Baby Jesus's house"- by the morning he had broken the whole thing!!

Saturday, October 30, 2010

ambitious

I have to stop looking at Do-It-Yourself Blogs. In my head I have become a master of sewing (even though I haven't gotten my sewing machine plugged in yet) and all other crafty things. Is it nesting? Maybe, I just want to make everything i see!! Here are a few Christmas presents I hope to accomplish for my kids and a few other kiddos in my life...

1. A puppet theatre for Jackson!
2. A Book Sling for baby, Jackson, and a few other special little people.
3. A Hobby Horse for each of my little boys.
4. An Advent Calendar (for next Christmas I think) for my little guys.

Of course all of these have to wait until AFTER I have finished my class (due Nov. 30th)and baby #2 is born (November 9). But maybe I can get a few of these done...