Showing posts with label fabric. Show all posts

Tuesday, March 8, 2011

Finished and Hung... finally

Andy and I put together some artwork for Jackson's room... I posted about it here. about 3 weeks ago on an ever exciting Thursday night at the Moore house I put together a picture board to go along with the art work.  The art work is 8x10 was just too small for the big wall so I added the board.  I got the idea from the blog Delightful Order.  I used a piece of fabric I picked up from Wal-mart that was a remnant, the board is from the basement... I think it came from my classroom, and the buttons are from Wal-mart (side note, the buttons Wal-mart sells -- Amazon, JoAnn's, and Hancock are actually made in Lansing, Iowa at the button factory... just a few minutes from us).  I have bought more big buttons to add to the board, because I like the look of them better than the small buttons.


Jackson loves his new photo board.  I need to get some new pictures up there... he looks at it each day and tells us all about the pictures.  I think I need to add a few more straps to the board to hold more pictures and to hold them more securely.  They tend to fall off (especially when there are little 2 year old fingers pointing and touching them).  You can also see that our little guy LOVES to read.  He is reading Mike Mulligan and the Steam Shovel (one of his favorites, he calls it the Steam Shovel Book and makes Daddy read it at least 3 times a week).   *** He can "read" many of his favorite books with us, we stop reading and he will fill in the words of the books we have read a few times.  It's adorable.
Side note... I am becoming a little bit obsessed with Picnik...  I messed with the photos and the coloring looks more green than it really is.  Below is a picture that shows the true colors of the room.  Which pictures do you like better??  I like the look of the above pictures, but like that the second set shows the true coloring of the room and the little man.


Saturday, March 5, 2011

Mail Center

In an attempt to get rid of the clutter and put things away, I have developed a "mail center".  I got a lot of ideas from A Bowl Full of Lemons.  She did a challenge  in January and it really helped to see how people all over the country- world organized different areas of their homes.   Every house is set up differently, so I picked and chose different aspects from the examples linked to her page.  Check it out,  it's neat!

This project has been in a work in progress.  I started off with these pieces of fabric and hanging file bins.


I used Mod Podge to attach the fabric to the bins, Andy hung them up and they looked like this...
The first part of this project was a mail center to help with our filing system.  It started out at the desk, but I moved it,  because the papers were never ending up in the filing system Andy we just ended up carrying them all over the house and things were still getting lost.  I got this box at Wally World and added hanging file folders to it.  I also put a couple of monograms on  the box, using my Silhouette.


 Before, on the desk
The system:  1 for each member of the family, 1 to pay, 1 to file, 1 receipts, 1 grocery/coupons (for lists, recipes, coupons), and 1 for phone books (this one might not last long, because it's no longer by the phone).

Here is the box in its new home by the back door where we enter the house 99% of the time.  I got this cute table at a store here in town called Wall to Wall.  I intend to  paint it black when the weather warms up.

As you can see from the previous picture, I added some more "stuff" to the mail center.  I used my Silhouette to cut out the words: Mail, In, & Out.  I had to used Tacky Glue to get the letters to stick to the fabric.  I'm not sure if the ones on the wall will stay... I used Silhouette's Flock dark brown Vinyl and it doesn't seem to be holding all that well.  I may have to cut it out of a  different vinyl, but I LOVE the look!  Also I "covered" a small cork board that we had hanging up by the desk with a coordinating fabric.  When Andy gets home, he will be hanging it! :)

Here are a couple more pictures of the finished product...


I can't wait for Monday and the mail to arrive!!!

Photobucket

And 


Tuesday, February 1, 2011

Another wreath...

Since my Christmas fabric wreath broke and I didn't get to show it off to anyone... I decided to make one for Valentine's Day... I love it.  It took 3 days of naptime to accomplish, because Maxell (12 weeks, wow) doesn't sleep too long during the day.  Here it is...


This is what it looks like on our door, but I can' figure out how to make it look correct, please turn your head to the left to envision the beauty. ;)
Picture of my mantle... Lots of blogged ideas
prints:  owl, subway art left, subway art right, wreath, heart bouqet ( can't remember)

I'm officially done making things for Valentine's Day!  I have to work on a couple of gifts now!

Sunday, January 9, 2011

Tie crafts

I love easy and no-sew crafts--- I still haven't used my sewing machine... this week, I tell myself again for the 15th in a row... Here are a couple Tie crafts I've accomplished in the last few weeks.


This is a tie scarf made out of Jersey Knit fabric (stuff you make T-shirts out of), I found it on MaryJanes and Galoshes, cute site! It was super easy and really inexpensive to make. The hardest part was getting my butt downstairs to use the iron on the fabric! I think they will be gifts for a few people this year.


This is the tie blanket we made for Maxwell for Christmas. Andy helped me to tie the sides, super duper easy! There are tutorial out there if you don't know how to do it! I love the fabric for this project!

Wednesday, December 15, 2010

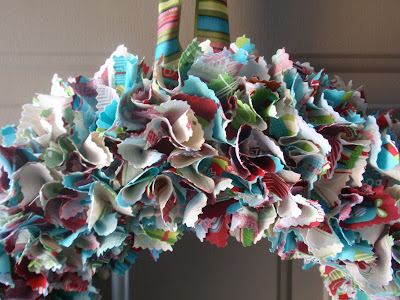
Fabric Wreath


I LOVE this wreath!


I got the fabric at JoAnn Fabrics and it didn't take too much time... I made a pretty big wreath so it took about 1.25 yards of fabric. I chose to only use 3 different kinds of fabric, because that was what I could find in the fabrics I liked (50% off though). I got the idea from Polka Dots and Pizza. She made a tutorial that you can take a look at. I wish I had a pinky blade for my roatary cutter, because cutting all the squares was hard on my fingers!!